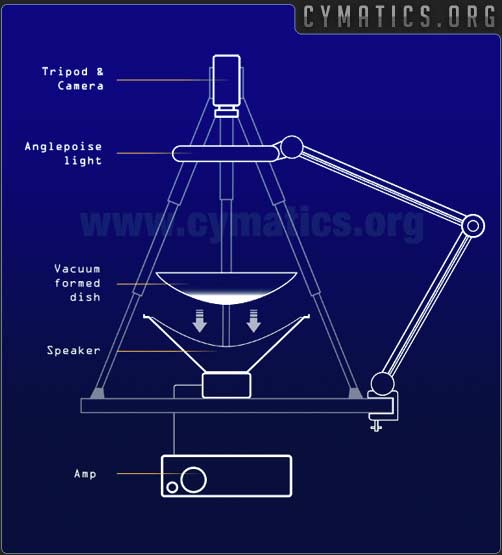
Here's our guide to building a basic Cymatics rig using commonly available parts.
We've built ours using a combination of over-the-counter and custom made components.
Where custom
parts are used we've sourced suitable alternatives for this guide.
** If this is the first time you've attempted a home project like this then please READ OUR DISCLAIMER before you continue. We want you to be safe!

Shopping list
AMP
We used a 450 Watt Mosfett mounted in a custom built aluminum case.
In fact any suitable amp and matched speaker should work. If you're unsure about matching amps and speakers
your local audio specialist or electronics store should be able to advise you.
SPEAKER
We used a Celestion Truvox 1525 for our rig. A decent mid range speaker should also
create a good variation of shapes. Tiny speakers [tweeters] don't produce such a broad
range of patterns as larger speakers. They also have a smaller surface area which
isn't so good for attaching a dish too.
DISH
Our dish was vacuum formed to fit the
speaker cone. In fact any light weight plastic dish will do - the thinner the better. Packaging is also a good source for bowl shaped bits of plastic
for example we've used an 'instant noodles' lid for our dish. You may even have an old Tupperware dish at the back of your cupboard
Instant noodles lid, sanded and sprayed black
Choose a dish which is slightly smaller than the diameter of your speaker so that it sits comfortably in the speaker cone.
SEALANT, SAND PAPER, MATTE BLACK PAINT
Silicon sealant - we need it for attaching our plastic dish to the speaker cone.
You'll also need a fine grade sand paper to prepare the dish for spraying, and a can of matte black paint [aerosol]
for spraying the dish. Black gives the least reflective surface when taking photographs.
LIGHT SOURCE
Our lights were custom built but any lighting source that illuminates the dish without
obstructing the camera view will work. In the past we've used an angle poise magnifier
lamp. We'll be basing our instructions
on this so, If possible check the light over in
advance, you'll need to be able to remove the lens and the lens hood from its housing.
CAMERA MOUNT
The camera mount is used to support the camera directly above the dish. We used an adapted copy stand but a small tripod will work equally well.
SPEAKER CABLE & AUDIO CONNECTORS
You'll need to connect your amp and speakers together. Radioshack or Maplin will sell you
suitable [and cheap] speaker cable. You'll also need audio plugs to connect your audio source
[computer/tone generator] to your amp. Again, any decent electronics store should advise
you on which cables you need for your setup.
EAR DEFENDERS
...or earplugs to protect your lugholes. Things can potentially get very noisy.
A LARGE EMPTY SPACE
Finally you'll need a decent sized space to assemble your rig, also a workbench or old
table something solid that can take low frequency vibration without moving around
too much
don't use the family heirlooms for this.
You're also likely to be spilling liquids, so keep
some cloths handy for any mop up
Assembling all the parts
Lightly sand the dish on the bowl side in preparation for spraying.
Your dish needs to be dry and free of any grease marks before applying the paint.
Spray the bowl of the dish with your matte black paint and leave to dry in a well
ventilated area.
Make sure your angle poise lamp is unplugged from the wall socket.
Remove the lens and lens cover from the housing. This requires a little disassembly,
usually just a few screws to release the housing that holds the lens in place.
Re-assemble the light so that you're left with hole where the lens used to be.
Once the paint on the dish has dried, attach the dish to speaker cone by evenly applying 3-4 blobs of silicon to the underside of
the dish. Check in advance where you dish contacts the speaker come so you know where to apply the blobs of sealant. Now slowly lower the dish onto the speaker cone so that it is level
and central. Because the silicon sealant is slow
drying you'll have time to adjust
the position of the dish before things begin to stick.
Once the silicon has dried and your dish is attached firmly to the speaker cone
place the speaker and dish assembly on your work bench, dish facing upwards.
Position the angle poise light centrally above the dish so that when you look through the angle poise, you're looking directly down into the centre of the dish. You could also try adding some gels [plastic sheet] to change the colour of your light source Before you do this, check that your light source doesn't get too hot as it may melt any plastics you put in close proximity.
Place the tripod and camera above the angle poise light so that the camera looks
through the centre of the angel poise [now minus its lens] and into the centre of the dish
That's the basic construction finished.
SOUNDS
Once you've completed this basic setup you'll need a tone generator or
other sound source to feed a signal to your amp. A home computer is a great source for generating
different types of audio signal from very basic tones to complex harmonic sounds. Simple sine waves work well, although it's also worth experimenting with music
and voice to see what creates the
most interesting results.
TURNING IT ALL ON
With your amp, speaker and sound source connected, place a small quantity of
liquid into the dish. Start with the amp volume at ZERO and then slowly increase
volume until you start to see patterns forming.
If you hear sound but see no shapes in the liquid, try a lower frequency [bassier] sound or
try increasing the volume.
It's also worth experimenting with powders as well as liquids. Also combining powders
and liquids together - cornflower and other non-newtonian fluids can create interesting
and often unexpected results.
Thanks to Si B. for building our rigs & helping us with this guide
All images on this site © Dan Blore . Cymatics.org
|


